Overview
DataWORQ is implemented as a Java web application deployed in an Apache Tomcat application server.
DataWORQ is installed as a DataWORQ.war file. Follow these steps to install DataWORQ. Users will access DataWORQ through their browsers.
Installation Steps
Installing Java 17 Runtime
-
Run the installer at
\Installation Files\Java JRE\OpenJDK17U-jre_x64_windows_hotspot_17.0.6_10.msi -
Apply all defaults
-
Open a command prompt and type: java -version
-
Confirm the output is Java 17 x64
Whitelisting QueBIT for product activation
Java maintains a list of trusted Certificate Authorities. We need to add the quebit.com certificate chain to that trusted list for automatic product activation. If you are planning on using an air gapped system you can skip this step.
-
Navigate to https://software.quebit.com
-
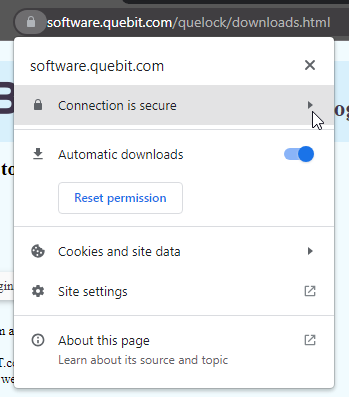
Click on the lock to the left of the url and select the "Connection is secure" option.
 {height="" width=""}
-
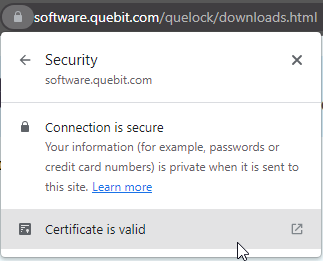
Select the "Certificate is valid" option.
 {height="" width=""}
-
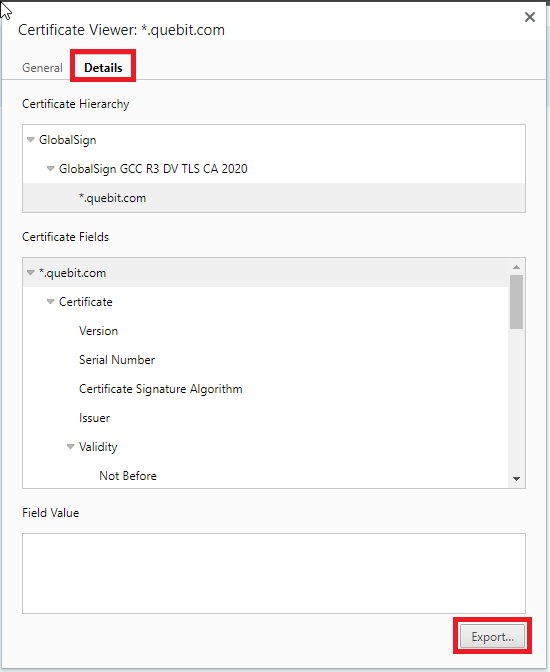
Navigate to the "Details" tab and click the "Export" button on the bottom.
 {height="" width=""}
-
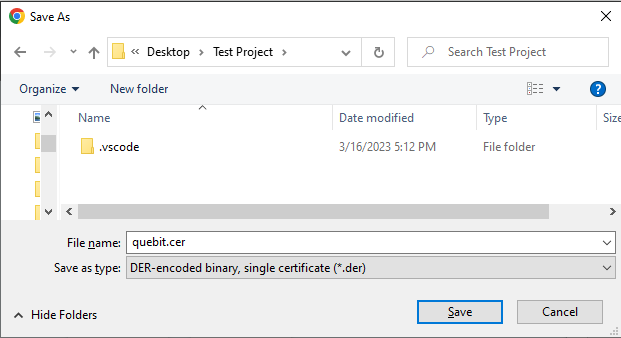
Update the "Save as type" to "DER-encoded binary, single certificate (*.der)" .
-
Update the filename to "quebit.cer".
-
Choose a directory path you will remember (It will be used in step 10 below).
-
Click "Save".
 {height="" width=""}
-
Navigate to your
<JAVA_HOME>/bindirectory and run command prompt as administrator from that location. -
Run the following command:
keytool -import -alias quebit -keystore "<JAVA_HOME>\lib\security\cacerts" -file "<PATH_TO_CERTIFICATE_FILE>\quebit.cer"
- When prompted for the password enter it in and press the enter key (if you didn't setup a password the default value is
changeit). You will not see characters when typing the password, simply press enter after you typed it in to submit it.
- If prompted to accept/trust the certificate type
yesand hit enter.
Installing Apache Tomcat version 10.1.7
Note that <TOMCAT_DIR> referenced belows refers to the top-level folder for Tomcat, i.e. C:\ProgramFiles\Apache Software Foundation\Tomcat10.0
-
Run the installer at
\Installation Files\Tomcat\apache-tomcat-10.1.7.exe -
Update HTTP/1.1 Connector Port to '9696'
-
Specify the Tomcat adminstration login (ensure your password is complex):

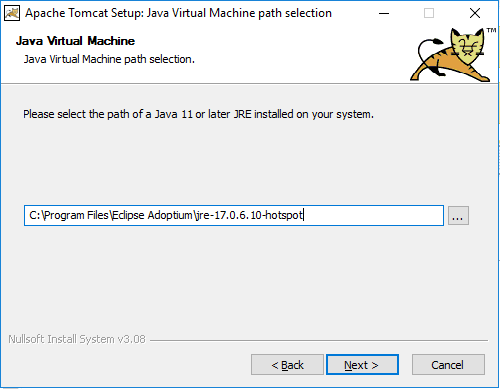
- Validate the path to the Java JRE based on selection:
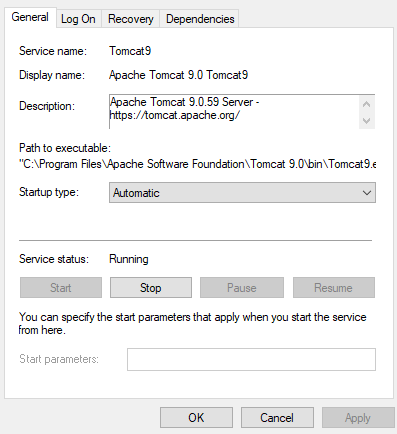
- Navigate to Services:

- Update the Startup Type to Automatic:
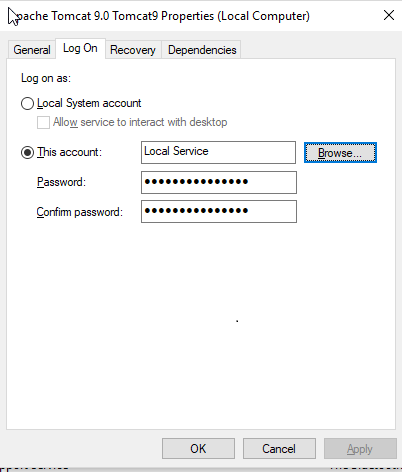
- Update the Log On to the User or Service Account created for DataWORQ (this restricts tomcat's access to that of the User or Service Account):
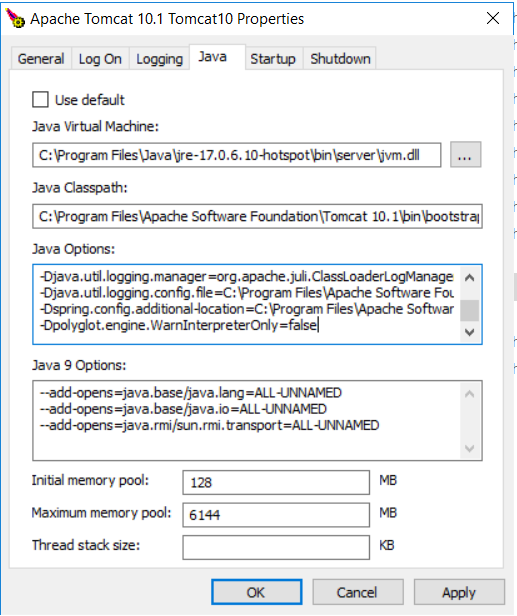
- Ensure that Tomcat has at least 6GB (more is better, 12 is optimal) of free memory by running the
Tomcat10w.exeapplication from<TOMCAT_DIR>\bin- Update the Maximum memory pool setting on the Java tab:**
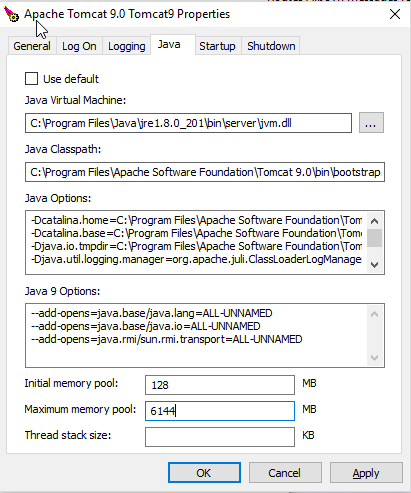
- Add the following parameters to the bottom of the Java Options section:
-Dspring.config.additional-location=C:\Program Files\Apache Software Foundation\Tomcat 10.1\conf\DataWORQ\dataworq.properties
-Dpolyglot.engine.WarnInterpreterOnly=false
- Move the properties file at
\Installation Files\Tomcat\dataworq.propertiesto the Tomcat\conf\DataWORQfolder
Setting up SSL for Tomcat (optional)
Various authentication modes such as Azure OIDC require SSL setup for Tomcat
- Follow the Tomcat SSL setup instructions here.
Installing H2 Database 2.1.214
DataWORQ utilizes a relational database, H2, in order to store some relevant metadata. It’s highly recommended to set up H2 on the same machine as DataWORQ, but this isn’t required.
Note that <H2_DIR> referenced belows refers to the top-level folder for H2, i.e. C:\Program Files (x86)\H2
-
Run the installer at
\Installation Files\H2\h2-setup-2022-06-13.exe -
Copy the
wrapper.conffile at\Installation Files\H2\wrapper.confto<H2_DIR>\servicefolder
Note that there are a few parameters in the above file that may be optionally changed:
-
wrapper.app.parameter.4=9695- This is the port number that DataWORQ will attempt to connect to. This port number is arbitrary, but needs to be configured in DataWORQ as well if changed
-
wrapper.app.parameter.7="C:/Program Files/Apache Software Foundation/Tomcat 10.1/conf/DataWORQ/h2db"- This path should reference the Tomcat conf directory for DataWORQ. If Tomcat is installed to a non-standard location, this path should be updated
-
In the
<H2_DIR>\servicedirectory, run1_install_service.batas an Administrator. This will add H2 as a Windows service. -
Navigate to Services:

- Update the Startup Type to Automatic:
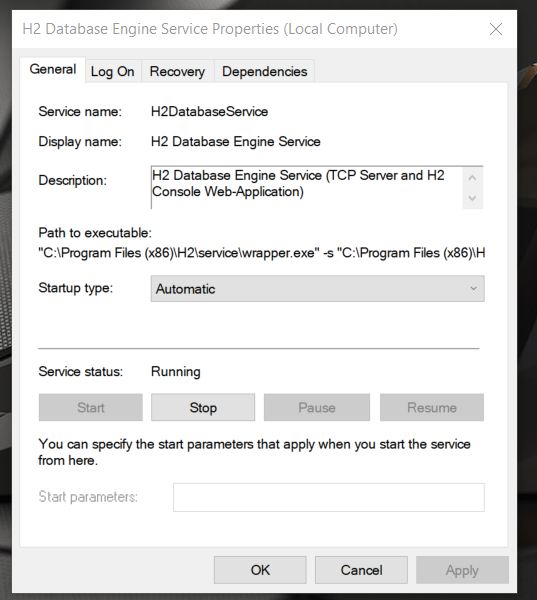
- Update the Log On to the User or Service Account created for DataWORQ (this restricts H2's access to that of the User or Service Account):
- Start the service to start the H2 server
Once the H2 server has been started, DataWORQ can now connect to it. In the dataworq.properties file, there are a few lines referencing the H2 database, preceeded by Embedded Relational DB
Installing MongoDB Server 6.0.5
Note that <MONGODB_DIR> referenced belows refers to the top-level folder for MongoDB, i.e. C:\Program Files\MongoDB
-
Download the installer here
-
Run the installer
-
Run as
Custom
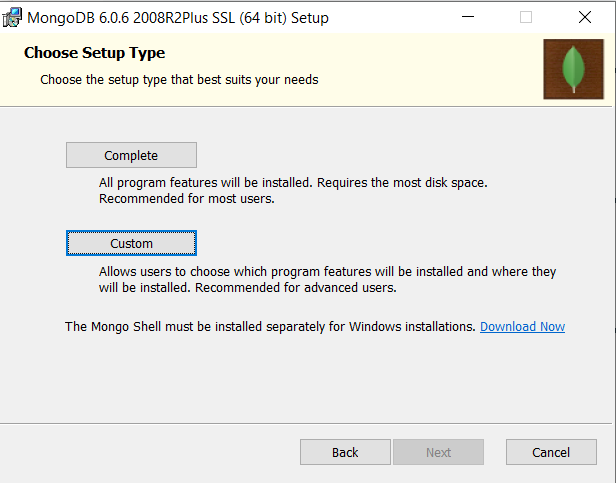
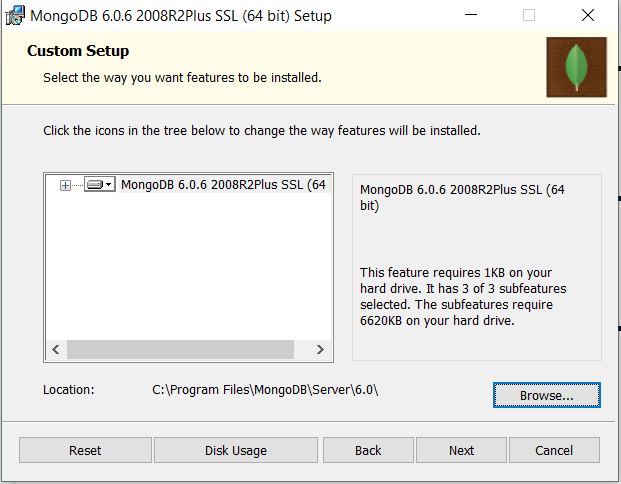
- Click
Browsein order to change the default installation location
-
Click
Next -
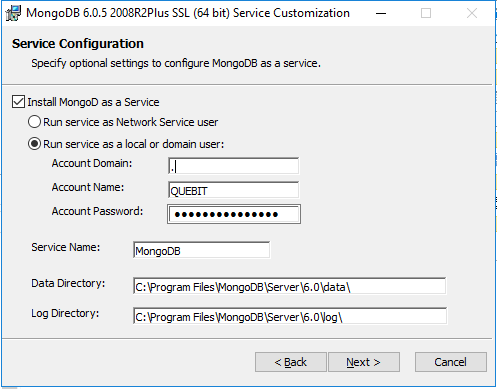
Install as a service
-
Update the Log On to the User or Service Account created for DataWORQ (this restricts MongoDB's access to that of the User or Service Account):
-
Stop the MongoDB Server Windows service
- Ensure the service startup type is set to Automatic
- Ensure the service startup type is set to Automatic
-
Move the file at
\Installation Files\Mongodb\mongod.cfgto the MongoDB Server<MONGODB_INSTALLATION>\binfolder -
Move the
\Installation Files\Mongodb\keyfile.txtfile to the MongoDB<MONGODB_DIR>\binfolder -
Start the MongoDB Windows service
-
Configure the MongoDB installation as follows:
-
Extract
Installation Files\Mongodb\mongosh-1.8.0-win32-x64.zipto<MONGODB_DIR> -
Run the extracted
mongosh.exeapplication inside<MONGODB_DIR>\mongosh-1.8.0-win32-x64\binto configure MongoDB -
Run the following command in the opened prompt
-
Hit enter to connect to the default instance
-
Initiate the replica set
rs.initiate()
-
-
Add an admin user. Enter a password when prompted.
use admindb.createUser( { user: "sa", pwd: passwordPrompt(), roles: [ { role: "userAdminAnyDatabase", db: "admin" }, { role: "readWriteAnyDatabase", db: "admin" } ] } )
-
-
Enter a password for the admin MongoDB user
-
Update the
spring.data.mongodb.passwordproperty in<TOMCAT_DIR>\conf\DataWORQ\dataworq.propertiesto the password that was entered above
Installing MongoDB Command Line Tools
Note that <MONGODB_DIR> referenced belows refers to the top-level folder for MongoDB, i.e. C:\Program Files\MongoDB
-
Download the installer here
-
Extract the archive to
<MONGODB_DIR> -
Update the
mongodb.database-tools.locationproperty in<TOMCAT_DIR>\conf\DataWORQ\dataworq.propertiesto the location that that was entered above- NB: Path must only include forward slashes
Installing H2 Database
- Run the installer provided here:
\Installation Files\H2\h2-setup-2022-06-13.exe
Use all default values and complete the installation
-
Move
\Installation Files\H2\start-h2.batto your<TOMCAT_DIR>\conf\DataWORQfolder. -
Run the batch file to start the H2 Database.
Note: You will have to start the H2 Database each time your machine restarts. To streamline this we recommend you setup a Windows Scheduler task to run the batch file on system startup.
Deploying DataWORQ to Tomcat
-
Copy the DataWORQ.war file into the Tomcat
<TOMCAT_DIR>/webappsfolder -
Set the authentication mode
-
Install any optional optional components
-
Start the Tomcat Windows service
Configuration
Directory Mappings
DataWORQ provides access to files on the host machine via directory mappings. This ensures that file management can be securely managed and isolated. These mappings contain the drive locations of the directories you would like DataWORQ to use when storing files. The mapping also contains the name of the folder as it appears to users in the application. The example below shows mappings for two physical locations. The first location is C:/temp and will map to / in the application UI. The second location is C:/temp/example and will map to /Example in the applicaiton UI.
{
  "rootMapping": {
    "sourceLocation": "C:/temp"
  },
  "mappings": [
    {
      "sourceLocation": "C:/temp/example",
      "virtualLocation": "Example"
    }
  ]
}
Setting the mappings
-
Move
Installation Files/Tomcat/directoryMappings.jsonto<TOMCAT_DIR>/conf/DataWORQ -
Edit
Installation Files/Tomcat/directoryMappings.json -
Update the
sourceLocationvalue (there is only one root directory mapping allowed) -
Update the
mappingsentries (multiple entries can be defined e.g.)
"mappings": [
    {
      "sourceLocation": "C:/temp/example",
      "virtualLocation": "Example"
    },
    {
      "sourceLocation": "C:/temp/alt",
      "virtualLocation": "Alt"
    }
  ]
Authentication
The following security modes are supported:
- BASIC - Basic username/password authentication
- AD - Microsoft Active Directory
- LDAP - Vendor-neutral directory service
- OIDC - Open ID Connect
- AZURE_OIDC - Open ID Connect via Azure AD
- SAML - SAML2.0-based authentication
In order to enable a security mode, update the following property in dataworq.properties
- security.auth-mode
These security modes each have a unique set of configuration properties necessary to set up the relevant authentication mode. They are all commented out by default and need to be uncommented to use the respective mode. Each group of settings are modeled after industry standards.
For example, spring.cloud.azure.active-directory.profile.tenant-id represents the tentant ID of the Azure AD instance,
For any specifics, please reach out to QueBIT's help desk at support@quebit.com.
User Setup
The first user to log in will automatically be set to the ADMIN role. This user will be able to add/enable other users to DataWORQ.
When a new user attempts to log in, the will be added to DataWORQ in a disabled state. An Admin must then enable those users in the Manage Interactive Users screen.
Execution
Enabling Command Line Node (Optional)
To enable the Command Line Node, change the following property in dataworq.properties:
- execution.commandLineNode.enabled=false
Optional Components
Python 3.10.11
-
Run the installer at
\Installation Files\Python\python-3.10.11-amd64.exe -
Accept the default values
-
Update the following dataworq.properties properties:
- execution.python.enabled=true
- execution.python.executablePath=PATH TO EXE
- NB: Path must only include forward slashes
R 3.10.11
-
Run the installer at
\Installation Files\R\R-4.2.1-win.exe -
Accept the default values
-
Update the following dataworq.properties properties:
- execution.r.enabled=true
- execution.r.executablePath=PATH TO EXE
- NB: Path must only include forward slashes
GLPK 4.65
-
Extract
\Installation Files\GLPK\glpk-4.65.zip -
Update the following dataworq.properties properties:
- execution.glpk.enabled=true
- execution.glpk.executablePath=PATH TO EXE
- NB: Path must only include forward slashes
Validation
- Launch Tomcat manager:
- http://localhost:9696/manager/html
- Validate that the DataWORQ application is listed and has started:

- Log in to DataWORQ:
- http://localhost:9696/DataWORQ
SQL Server Windows Authentiction
For instructions on how to enable Windows Authentication in DataWORQ please visit: Enabling Windows Authentication for SQLServer JDBC driver